I've been an audio hobbyist since the early 70's. I built any number
of Dynakits back then, and like many other audio enthusiasts, have
been through a good number of iterations in the development of my home
system. I first started building loudspeakers back in 1976 when Audio
Magazine published an article on building your own subwoofer. It was
2 feet deep by 3 feet wide by 4 1/2 feet high. It had 21 cubic feet
of internal volume, used a CTS 15W38C bass driver, was un-godly
efficient, was 3 db down at 20 Hz, and could blow out match flames at
the port when I cranked up the volume on my M & K sub-woofer test
record. It was great fun for parties.
Since that time I built and designed a couple dozen loudspeaker systems
as I learned more about what I was doing. Life's circumstances took
me out of speaker building for some time until I decided I wanted to add
a couple of subwoofers to my system. The "refrigerator" had been sold
to a friend years before when I no longer had the space to keep it, and
my wife, as tolerant as she may be, was not going to live with something
that big in the living room.
My latest audio project has been the
Linkwitz Orion loudspeaker
,
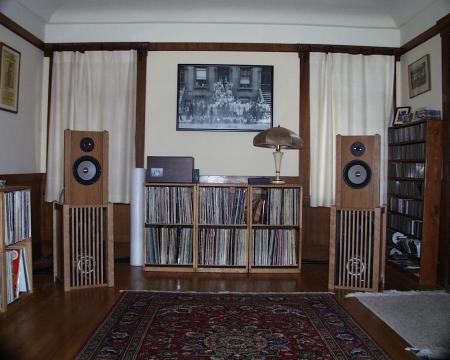 which I have detailed
here
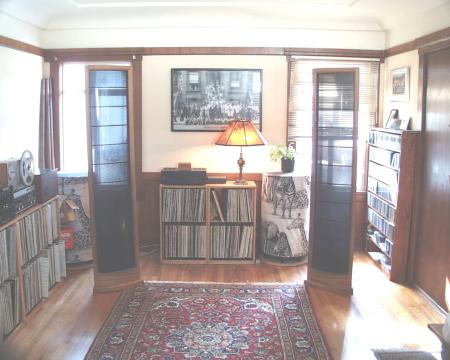
. This is my current system. I have
since sold off the sub-woofer pair described below as they are
no longer needed. I had been using them with my X-Static full-range
curved diaphram electrostatic loudspeakers. I sold the X-Static
pair and the subs went with them to a local audiophile who got one
hell of a good deal.
In brief, the Linkwitz Orion is a tri-amplified, fully engineered
system consisting of Seas tweeter, mid-range, and two long-throw
Peerless bass drivers on each side. Visit the Linkwitz site linked
above to read about the engineering details. As you can see from
the photos here, it takes up a lot less physical room than
does the electrostatic/sub-woofer based system shown in the photo
below. What is interesting is that they both have a very similar
tonal balance with regards to voices and acoustic instruments.
I have seen only one other dynamic loudspeaker that matched the
tonal qualities of the X-Static loudspeakers and that was the
much more expensive Avalon line.
One very interesting thing that came out of the Orion installation is
that I found I needed to decouple the speaker from the floor. For
years I've seen people spiking their loudspeakers to the floor
for rigidity. But my house is an old craftsman home, built 85
years ago, and the floor moves a bit. When the Orion pair was just
sitting on it, the low end was a bit anemic, and in fact, the
floor was absorbing the energy! So when the Orions were decoupled
by putting thick towels under them the bass response was dramatically
improved! Who would have thought that?
Back when I first got the X-Static loudspeakers,
 I had been thinking of
building a floor standing, downward
firing, cylindrical enclosure. It would have a minimal footprint, and
a smaller, faster bass driver than the old giant. Then I saw an article
in Stereophile about the Hsu Research products which were very much like
the idea I'd had for so long. It was time to get to work.
The results have been nothing less than completely satisfying.
It's a fun project and is quite within the
abilities of most people who are "handy" with woodworking tools. It
doesn't require a rocket scientist. It requires an audiophile. The
purpose of this project was to build a better subwoofer, not a
cheaper one, although that is a side benefit. British audiophiles like
to build their own loudspeakers because they believe that the home
builder can do things the commercial manufacturer cannot because those
things might be labor intensive and/or too difficult to a business
that has to build and design to a cost point.
Feel free to send e-mail if you
have questions about this web page or home hi-fi sub-woofers
in general. I'll answer as I have time. But do me a favor and
do not write with questions about automobile sub-woofer systems.
That is not my area of interest or expertise.
By the way, if you haven't seen it already, be sure to check out the web page
for my 18 piece big band,
Russ Button's Swing Orchestra.
The following subwoofer article is shown here for informational purposes only, and because so
many other sites link to it. The Peerless bass driver upon which this design is based upon is
no longer being manufactured, thus rendering this specific design obsolete. The design concepts
are still useful. There's nothing stopping you from taking this basic idea for a cylindrical
enclosure and modifying it for a different 10" bass driver. What will happen is that you'll
end up with a different port length and different frequency response from this particular design.
If I had my druthers in doing something like this again, I'd go for a cylinder that was 18" in
diameter, about 6 feet high, and use a 15" bass driver. That would give you about 10 cubic feet
of internal volume and with the larger bass driver, be able to move a lot more air. As one
designer I know says, "There's no replacement for displacement."
If you are moved to attempt a project like this after reading this article, I recommend that
you call up Madisound (contact details below) and tell them how big of an enclosure you want
to build. Tell them what size bass driver you wish to use and ask them what they have that
will work well in a Thiel-Small alignment. They're absolutely the best supplier of loudspeaker
drivers in the USA. They're very knowledgeable and helpful. They have my highest recommendation.
(1994)
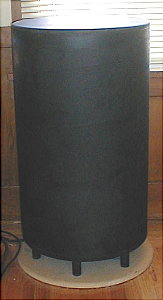
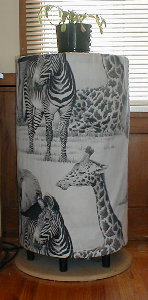
I recently built a pair of sub-woofers for my home system
that I am quite happy with. They are 3db down at 23 hz,
and can be built for about $300/pair, or $150 each. A number of people
have expressed interest in the design, so I'm publishing
it here. I designed it with the help of a friend who uses
LEAP (Loudspeaker Enclosure Analysis Program) on his PC.
I built two sub-woofers instead of one because with just
one sub-woofer, you get real problems with standing waves
in your room. With two sub-woofers you get two sources
of low frequency sound that tend to even out response
through the room.
Last year when I heard about the Hsu Research sub-woofers
I was very amused because they were something along the
lines of what I had been thinking of doing for some time.
So that's what I built for myself. Having read the
Stereophile article on them, I figured I could do one
modest improvement. Stereophile commented that they
because their enclosures were so lightweight that the
cone motion was enough to actually get them to rattle
a bit. You can pay $750 each for the Hsu Research
(last I heard), or you can build your own.
For those of you not familiar with the Hsu Research
sub-woofers, they are Theil-Small aligned, ported
enclosures, with floor firing, 10" bass drivers. What
has made them of interest is that they are cylindrical
enclosures made from Sono-tube and MDF. Sono-tube is
a hard pressed cardboard tube typically used in the
construction industry for casting concrete columns or
as debris chutes. MDF stands for Medium Density
Fibreboard.
Construction of the enclosure is simple in that it is
essentially the Sono-tube with MDF caps at each end.
The bass driver is mounted in one end and faces the
floor. I used six 1 1/4" dowell rods on each sub-woofer
as standoffs to a circular piece of MDF that is the
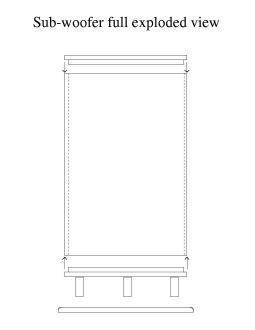
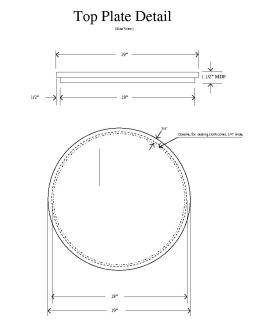
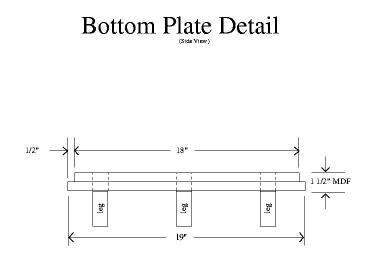
base of the unit. Below are my original construction
drawings.
I added mass from what Hsu did by making the two caps
from double thicknesses of MDF, and by having the base piece,
which I don't belive that Hsu did.
click for full size
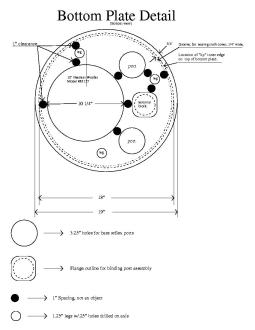
The hardest part of building these loudspeakers is cutting perfect
circles. You can't do this with a table saw or a hand held jig saw.
What you have to use is a router with a straight cutting bit and a
circle cutting jig. When cutting through 1 1/2" of MDF, it's a real
pain. Don't let this worry you unless you've never worked with wood
or routers before. Take your time. Be careful and it should come out
fine. If you don't feel up to this task, you might just want to go to
a local cabinet maker with the plans and have the caps cut for you. I'd
be interested to hear about this from anyone who chooses to go that
route.
Important parameters:
There are
two
ports made of 3" diameter PVC pipe, 12.6" in length.
This is extremely important.
The internal volume is 4 cubic feet. To translate that into a
dimension for the length of the Sono-tube, you also have to subtract
the air volume taken up by the two ports, the speaker cone and magnet
structure. I calculated the length of the Sono-tube to be 28.25".
I lined the interior with 3" fibreglas insulation, typically sold
as R11.
The bass driver is a
Peerless Model 831727
, 10" woofer. You can buy them for $54.00 each from:
Madisound
Flat mail
Box 44283
Madison, WI 53744-4283
Shipping address
8608 University Green
Middleton, WI 53562
Tel: (608) 831-3433
Fax: (608)831-3771
E-mail to Madisound
You don't have to build them from Sonotube as I did. You can build
them with a box design if you like. The critical parameters are
the internal volume (minus the port volume), the two 3" PVC ports
each 12.6" long, and that particular model of Peerless bass driver.
The ports may be "bent" if you like. You take the port and cut
it at a 45 degree angle and turn it around and reglue it.
        ______________
                     /|
                    / |
                   /  |
        ----------/   |
                  |   |
                  |   |
                  |   |
                  |   |
                  |   |
Yet another lame ascii drawing. Oh well, I hope you get the idea.
I used a piece of Sonotube that was 18" in diameter because I put
both ports and the bass driver on one end. Lay them out and you'll
see what I mean. You could put the ports and the woofer on opposite
ends and use a tube with a smaller diameter and more length. This
would help minimize footprint if that is of interest to you.
If you decide that you want more power handling, or a bigger cone,
or whatever, Madisound has an excellent design service that will
provide you help in any project you have in mind.
I'm using an active Behringer CX-2310 crossover (Linkwitz-Riley 24db/octave)
and a Hafler Pro 2400 power amp for the subs. It's a terrific combination that is matching
up well with my main speakers (full-range electrostatics) driven
by a Hafler Pro 1200.
> Thanks for sending me the article on your sub project. Everything
> is quite clear except for three measurements: the length of 18 inch
> sonotube, the length of the dowels seperating the bottom plates and
> the distance of the vents from the side of the sonotube(or is it
> important?). Also did you mount the on the inside or outside of the
> MDF?
>                                         Thanks again LPL

Geez.  Must I tell you everything?  :-)

The length of the 18" Sonotube was 28.25".  The enclosure is a 4 cubic
foot volume that does not account for volume taken up by the ports or
the cone and magnet structure of the bass driver.  I probably went
to excessive trouble in this, but since I was building it myself, I
figured "Why not?"

The dowels gave a 3" spacing.

I mounted the woofers on the bottom of the baffle board, which was the
outside of the MDF.  I cut the hole carefully so that it was a good
fit to the bass driver, and just mounted it with Silicon caulk.  I
didn't use any screws.  If you mount it and let the caulk cure for
24 hours, it's PLENTY strong.

As I said in the article, the hardest thing is to properly cut circles.
A Craftsman router with the circle cutting jig and the proper bits
should do you OK.  Take your time and make test cuts in scrap before
cutting your pieces.  Setup time for these cuts and testing are what
takes so long.  You should be able to do this project in a weekend
if you make your caps in 1.5" thick MDF like I did.

The other hard part is figuring out how to decorate the resulting
speaker.  Are you married?  Do you have a domestic partner who cares
what things look like?
> two questions:
>
> 1)  I am planning to use 3/4" MDF, is this what you used?

Yes, but I glued it up to make 1 1/2" thick pieces for each end-piece.

>
> 2)  How did you attach the MDF to the Sono-tube?  I am thinking of
> using silicone RTV so it can be removed if I ever need to get inside.

I cut a 1/4" x 3/4" rabbit on each end-piece and glued 'em into the tubes.
> I am intrigued by your project to say the least. Where does one buy
> sonotube and how thick is the stuff you used for your subs?

You buy it at concrete supply shops.  It is typically used for casting
concrete columns.

> I am wondering how well sonotube would work compared to 3/4" MDF.
> Wouldn't there be a lot of flexing given the small thickness of the
> tube? I don't know much about cabinet design (yet!) so pardon any
> stupid questions. :)

You're asking the same questions I had at first.  The tube is about 3/16"
thick.  I was surprised.  I thought it would be thicker.  What I had seen
before was larger diameter sonotube.  Even so, it works fine.  A cylinder
is a very rigid structure when it is capped.  Remember that sonotube is
basically a very dense cardboard, so it is even more "dead" and
non-resonate that MDF!

> I have also been thinking about bracing for this beast. One way to
> brace it, and also add some more weight, would be to use 1/2" to 3/4"
> plywood (cut round the same diameter as the end-caps) but with a large
> hole (round or square) in the center--perhaps leaving and inch or two
> thickness all around for strength. Two or three of these inside the tube
> would help, no?

Not needed.  I added weight by making the end pieces double thickness (1 1/2")
of MDF.  I also added another piece of MDF that the bottom would stand off
from.  Remember that the bass driver faces the floor, so you have to have
some sort of legs or feet to the enclosure.  I put 3" legs on the bottom
and attached them to that additional piece of MDF.  If you wanted to get
even more wacko about adding weight, you could make that piece a double
thickness as well.

> How did u attach the end-caps? Did u just glue them to the sonotube or
> did u use other fasteners of some sort?

You can either use glue or silicon caulk.  I use silicon caulk to mount
the bass drivers and ports anyway.

> How did u finish the outer tube? Is the tube seemless or is it sorta
> spiral wrapped? (I've never seen sonotube)  :)  If it's seemless I was
> thinking of several coats of primer with many coats of black laquer
> paint.

This is one of the more difficult parts of the project.  Making it look
good.  The tube does have a spiral wrap around it.  It also seems to
have some sort of waxy substance in it as well.  You might consider filling
in the spiral seam with Bond-o automotive body filler or something similar.
Then a good primer and laquer would probably be OK.

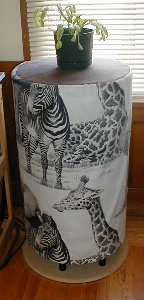
I talked over this phase of the project with my wife at some length.  We
decided to make a fabric "sock" to pull over the cylinder, and then staple
to the baffle board at the bottom of the enclosure.  We went down to the
fabric store and looked around.  No matter what we looked at, we realized
that we were going to have these big cans in our living room.  Then we saw
this wild African print in black and white that was covered with animals.
We decided that if we were going to have cans in our living room that instead
of trying to make them inconspicuous furniture - a lost cause - we'd instead
use them to our advantage by making them really wild looking.  We have a
two year old at home and he likes the animals.

If you could do a real hard lacquer, and polish it, that could be very cool.
You don't have to do black either.  It could be any color really.
> I am very interested in building the subs that you wrote about.
>
> My questions are:
>
> Are the dowell rods the feet of the sub or are they internal connecting
> the base and top together?

They are feet connecting the baffle board to another circular piece of MDF
that actually sits on the floor.  This isn't absolutely necessary.  You
can design your own feet, but I like this approach myself.  I made the added
piece of MDF sitting on the floor 2" larger than the tube for added stability
and added mass to the encosure.  One of the problems with the Hsu Research
speaker is that it didn't have enough mass to adequately control the cone
movement of the bass driver.  In the Stereophile review, the Hsu unit vibrated
because of this.  I've used significantly more MDF that Hsu did, and thus
have made the total mass of the enclosure greater (I think).  Remember I used
1 1/2" thicknesses of MDF for both the top piece and the baffle board, and
a single piece of MDF for the floor piece.  That's likely to be a lot more
mass than what Hsu did.

> What crossover do you use?

I use a Behringer CX-2310, with 24 db/octave Linkwitz-Riley filters.

> What was the measured response in-room of the subs?

I have no way to accurately measure the in-room response, but I did
do a frequency sweep and was surprised at how smooth the room response
seemed to be, especially at the crossover point!  I've heard bad active
crossovers and am totally thrilled with the performance of the Marchand.
I cannot recommend it highly enough!

> What are the advantages of fiberglass over dacron  -- someone on the net
> stated that fiberglass breaks apart over time polluting the bottom facing
> woofer anf the air.?

Dacron is typically used in pillow stuffing, and is fine for acoustic
suspension enclosures.  But this is a Theil-Small alignment and requires
that you have a 3" lining around the interior of the enclosure.  The
Dacron I'm familiar with won't fill (pardon the pun) that requirement.

If you're worried about bits of fibreglas falling down over time and
disturbing the driver, you can do like AR did years ago on the old
AR-3 loudspeaker.  They tacked a light (and I do mean LIGHT) piece of
cloth around the back of the driver basket.  I suggest a fine, openweave
material like cheesecloth.

> I have found a way to make the MDF top and bottoms perfectly round;  I
> trimmed the pieces on a wood lathe for a perfect fit.

Good idea!  We should ALL have wood lathes!  :-)
> I was almost ready to buy one of HSU's subwoofers but found your page
> and have change my mind.

Ahhh!!!  A bold man!  Good for you!

> I am trying to decide on the complexity of the project and have figured
> out that I can do pretty much everything but cut the circular timber
> (but I have a solution for that sorted).

If cutting the circular parts is too difficult for you, you could
probably get a local cabinet maker/woodworker do it for you for a
reasonable price.

> I am thinking about using one sheet of MDF and one sheet of pine for the
> top. Cutting the MDF so that it snuggly fits inside the tube, with the
> ping having an extra one inch in radius. I am going to glue these
> together so it fits like a plug on the end of the tube.

That is the idea.  Why are you choosing to use pine?  It's a soft wood and
not terribly attractive.  I did a double thickness of MDF and just painted
the top, bottom, and tube flat black.  Then I had my wife make a fabric
sock that we just pulled over the top.  What really made this work was that
the material was a black and white print with African animals on it.  From
a decoration standpoint, these things are just big cans sitting in your
living room.  I like the idea of making them standout in some way interesting
rather than making them look bland and trying have them disappear.  They
aren't going to do that...

One of the advantages to doing double thicknesses of MDF is that you add
to the mass of the total loudspeaker.  One of the problems with the Hsu
product is that the enclosures tend to vibrate because they aren't heavy
enough.  The bass driver faces down, and due to Newton's 3rd law of motion,
action/reaction, the enclosure tends to move in the direction opposite to
the motion of the cone of the bass driver.  By adding to the mass of the
enclosure, you greatly reduce that issue.  I used double thicknesses for
both the top and bottom caps.  I also added a larger circular piece as a
foot, which I attached to the bottom of the loudspeaker.  I believe that
Hsu just has single thicknesses on top and bottom, and feet that extend
to the floor.  So I have 3 added pieces of MDF more than he does.

As for using pine or some other wood for the top of the enclosure, how
do you plan to decorate the rest of it?  I suppose I can think of a
variety of ideas here, but the fabric sock is the most simple and effective
that I can think of.

> My question is on the enclosure volume. How did you come up with the 4
> cubic feet?

I just thought that 4 cubic feet would be a nice compromise between
efficiency and bulk in the room.  Let's face it.  Speakers are never
particularly attractive items in a room, and I have a wife.  I figure
that 4 cubic feet still retains a suitable WAF (Wife Acceptance Factor)
value.  If you are able to have more internal volume for your enclosure,
you will get somewhat lower extension of the low frequency cutoff and
greater efficiency, both good things.  With a cylindrical design, you
can just add height to the enclosure, get that added volume, and still
have the same floor footprint.  The only issue here is that you'll have
to have someone redo the calculations for you.  Your port size and
depth will change as a result of using a different internal volume.
There's nothing wrong with this, but you'll have to redo the calcuations.
I know that Madisound can do this design work for you, even if you
buy your bass drivers from somewhere else.  You can probably correspond
with them via e-mail for this service.  Since you're in Australia,
I assume that you buy your bass drivers from a dealer there.

> I am looking at buying a driver locally and would assume the volume of
> your enclosure would change depending on the driver used, is this
> correct?

When you do the calculations, you input various design parameters of the
bass driver, and whether you want a maximly flat response or a maximly
low response, or a tradeoff between the two.  You can vary the volume
and get different port dimensions, or vary the port dimensions and get
different enclosure volumes.  I recommend choosing the largest volume
you can live with in your room, and then working the model to get a
good tradeoff between low frequency response and flat response, and
then seeing what port dimension you come up with.  In the case of my
design, I had a choice of using a single large tube for my port, or
two smaller tubes.  I chose the two smaller tubes because it made
for a smaller circular baffle board to mount things on.  Try laying
out a baffle board with two 3" holes and the hole for the 10" driver,
and a baffle board with one 4" hole and the hole for the 10" driver.
I actually ended up with a smaller board with the two 3" holes, which
is what I'd recommend to you.  So you then only really need to know
how long the 3" pipes need to be.

If you plan to go with more volume, you'll be redesigning the enclosure
from scratch.  Once you know how long your ports are, you'll need to
carefully calculate the size of the tube you intend to cut.  The ports
take up volume of the enclosure, so you have to account for that in
your calculations.  For instance, if your ports are to be 15" long, and
the inner diameter of the tubes are 3", the thickness of the tubes is
1/4", then the outer diameter of the tubes is 3 1/2", so the radius is
1.75", and the volume is PI*(1.75)*(1.75)*15, which is equal to
144.32 cubic inches each, or 288.63 cubic inches total.  So if your
design volume is 8 cubic feet, then the cylinder volume needs to be
8 cubic feet, which is 13824 cubic inches, plus 288.63 cubic inches,
for a total of 14112.63 cubic inches.  For an 18" diameter tube, this
gives you a tube of length 55.46 inches.  Add in the 3/4" inset for
the caps at each end of the tube, and you come up with a length of
56.96 inches for each tube.  I'd just round it off to 57" length.
Now add 3 inches to the bottom for extensions to get it off the floor
and a bottom plate to stand on, and you're just up over 5 feet high.
If you're willing to go with the next size up in Sonotube (or whatever
equivalent product you have in Australia), then you can easily get
even greater volumes.
> If it's meant to be 4 cubic feet, and I've calculated the volume of the
> two ports and my bass driver to be 399.3295 inches cubed, is the total
> volume 4 feet cubed minus 399 inches cubed, or 4 feet cubed plus
> 399 inches cubed?

You're on the right track of thinking.  The internal volume needs to be
exactly 4 cubic feet.  The port and bass driver eat up some of that volume,
so when you build the enclosure, you need to add that to the total enclosure
volume.

Now you do realize that my design is for the specific Peerless bass driver
I used and ***no other*** loudspeaker driver!  This is very important!  It's
not that you can't use another driver in a 4 cubic foot enclosure and do
OK.  It's just that the port area and depth are quite critical and are
engineered to that particular Peerless driver.  If you want to use a
different bass driver, then you'll need to re-do the port size/depth
calculations, most likely in computer software.  This is not trivial.
I have a friend who has the software and does this sort of thing all the
time, so he "did the math" for me.  Then all I did was to actually build
it.  I cannot do this kind of design for anyone myself.

What is much easier to design in a transmission line, but they are typically
much larger enclosures and tend to be less efficient.
 which I have detailed
here
. This is my current system. I have
since sold off the sub-woofer pair described below as they are
no longer needed. I had been using them with my X-Static full-range
curved diaphram electrostatic loudspeakers. I sold the X-Static
pair and the subs went with them to a local audiophile who got one
hell of a good deal.
 I had been thinking of
building a floor standing, downward
firing, cylindrical enclosure. It would have a minimal footprint, and
a smaller, faster bass driver than the old giant. Then I saw an article
in Stereophile about the Hsu Research products which were very much like
the idea I'd had for so long. It was time to get to work.


